
Capturing your audience’s attention in today’s fast-paced digital world is no easy task. Whether you want to make a professional impression on LinkedIn or start a visual conversation on Instagram, you have a powerful tool at your disposal: carousels. These dynamic, multi-slide posts have taken over the social media landscape, allowing you to tell a story, show off a portfolio, or share insights in a way that is both informative and visually appealing.
If you’ve ever scrolled through your feed and stopped at a beautifully designed carousel, you understand the allure of this format. But what if you could design those jaw-dropping carousels that leave your audience wanting more? Yes, you can, and we’ll show you how in this post. Say goodbye to static posts and hello to an exciting journey into the world of carousel creation using Adobe Photoshop, everyone’s favorite design tool.
In the sections that follow, we’ll delve into the art of creating carousels that shine on both LinkedIn and Instagram. You’ll learn how to export a carousel in Photoshop. You don’t have to be a design guru to get started, but a little imagination and our step-by-step instructions will help.
So buckle up, fire up Photoshop, and let’s go on this visual storytelling adventure together. Your social media game is about to improve, and you’ll enjoy every slide of the journey.
Tools and Requirements
If you don’t have Photoshop, you can try using an online Photoshop clone, Photopea.
1. Document Setup
First, you have to decide what type of carousel you want to create—rectangular or square. Check out the recommended and standard sizes in the table below.
| Portrait | 1080 x 1350 px |
| Square | 1080 x 1080 px |
| Landscape | 1280 x 720 px |
| Portrait | 1080 x 1350 px |
| Square | 1080 x 1080 px |
| Landscape | 1080 x 566 px |

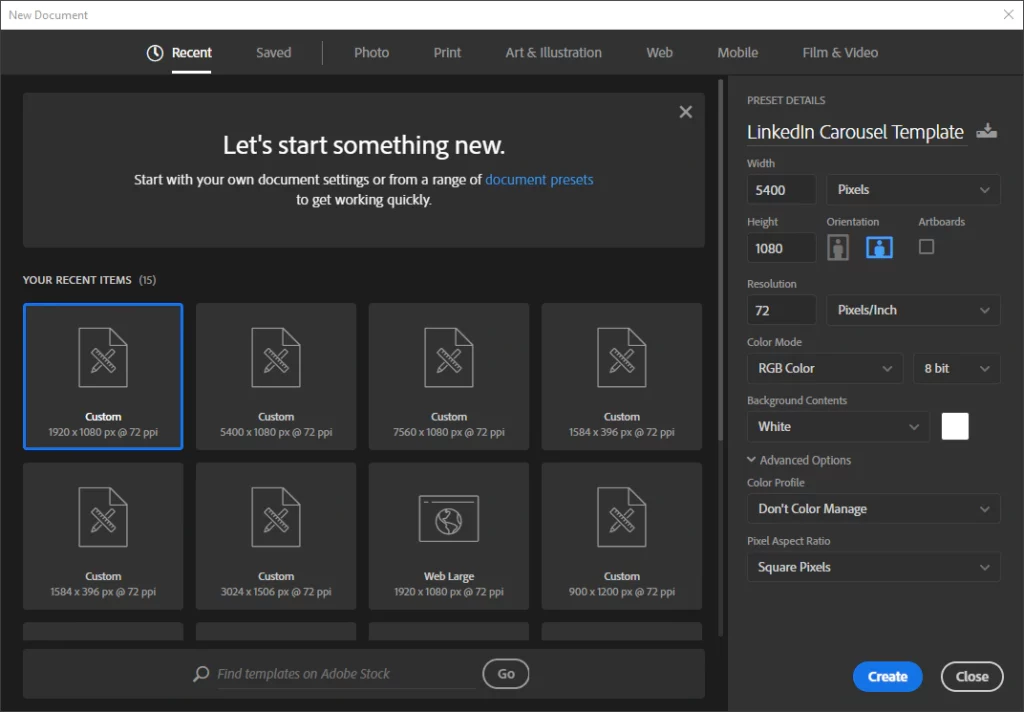
Now that you know what type of carousel you want to create, start a new document inside Photoshop and calculate the full width of your carousel.
Example: In the image below, we use 5 slides (width 5 x 1080 = 5400 px).
2. Slice The Canvas
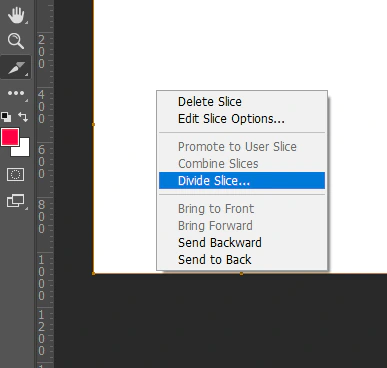
Use the Slice Tool to slice the document to the number of slides you calculated before. Click on the Slice Tool, then right-click anywhere on the canvas and choose Divide Slice.
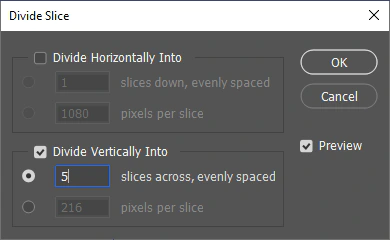
After this, check “Divide Vertically Into,” then type the number of slides in our carousel.
3. Setup Guides
Now that we have divided our canvas into 5 pieces, it’s time to set up guides for your carousel. How you want to set up your carousel is entirely up to you. Keep in mind that guides have the ability to provide consistency to your carousel.

4. Design Your Carousel
Now is time to be creative and design your carousel. Here is few tips for designing an effective LinkedIn and Instagram Carousel.
- Effective Storytelling
- Engaging Visuals
- Clear and Concise Messaging
- Consistent Branding
- Call to Action (CTA)

5. Export Carousel Images
Click on File > Export > Save for Web and click on Save. After this, you will end up with a folder called “images” in the location where you choose to save this document.
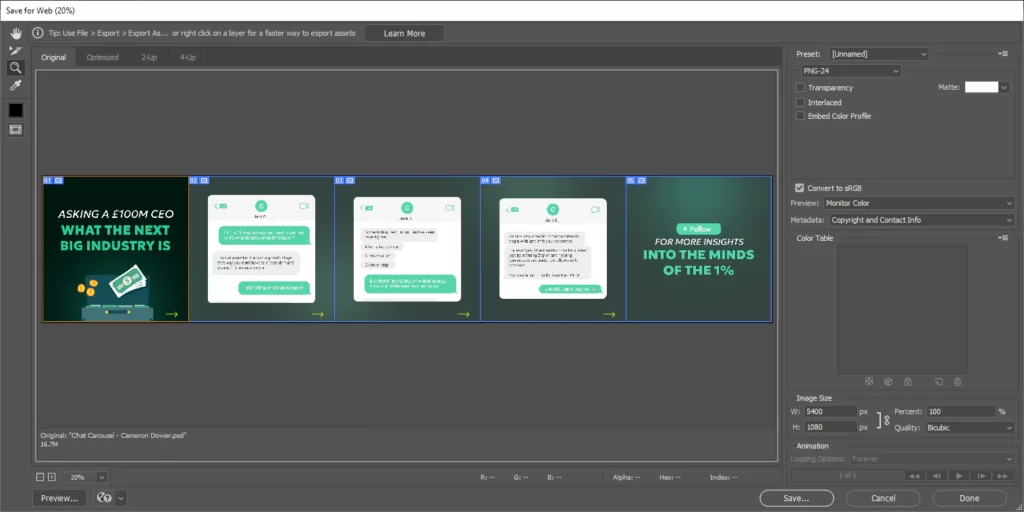
Now you have images, and you can create an Instagram carousel with these images. For the LinkedIn Carousel, there is one more simple step to create a PDF file.
6. Create PDF Carousel
One last step for our LinkedIn carousel is pretty easy. It doesn’t have to be only for creating a carousel; this tool can be used to create any PDF file out of simple images.
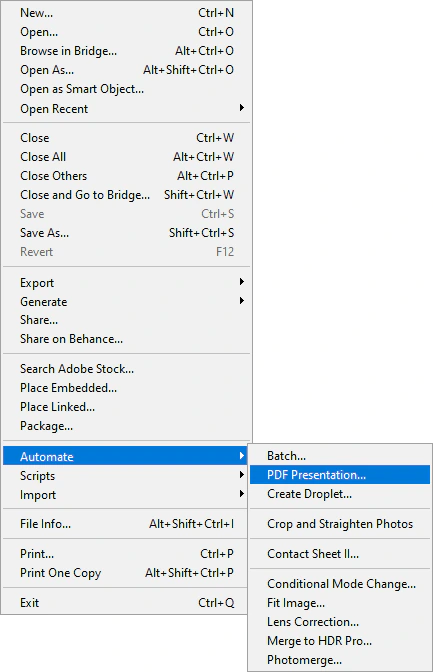
Click on File > Automate > PDF Presentation.
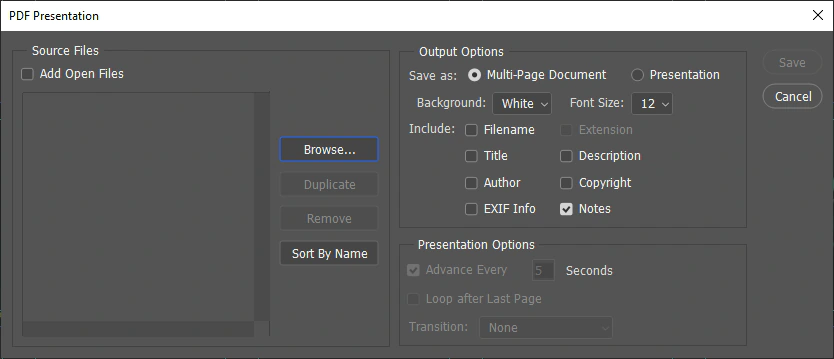
Now all you have to do is choose the previously exported images by clicking on Browse and selecting the images. After you choose the images, click on Save.
Examples and Inspiration
You can check out our example of a finished LinkedIn Carousel Design. Feel free to send us your first carousel created with this easy method.
Additional Resources and References
If you want to learn how to make a carousel in Photoshop with one of our pre-made templates. Get our ready-to-use PSD template for free.

